Pages

Thursday 10 September 2015

Leighton House Museum - Exhibition

The Craft of Drawing and Painting - Celebrating tradition today
1st September - 4th October

by Philip Rowling

by Philip Rowling


Last week I attended the launch of this new exhibition showcasing the work of the community of artists trained at Lavender Hill Studios.  Set in the beautiful home of Frederic Leighton (1830-1896) Leighton House Museum is well worth a visit in it’s own right as it was built and designed by Leighton to combine a working studio with space to live and entertain the Victoria London art world. 

View from the top of the staircase of Leighton's paintings 
by Philip Rowling


As a student of the studios I was very pleased to have a portrait drawing of my Mum accepted for the exhibition and to have it hung in such a wonderful place. 


With kind thanks to the event photographer Kevin Moran for letting me use this fab photo
www.kevinmoran.co.uk

Here is my model, my Mum, still looking good now she is in her 70's.
Thanks to all my family for coming along and continuing to support my artistic journey. 
Photo courtesy of Christine Vass.


As part of the exhibition the studios is also running workshops and events from life drawing in Leighton’s studio with Ann Witheridge to live portrait painting. Here are some links to find out more:

The Craft of Drawing and Painting Workshops and Events

Leighton House Museum

Leighton House Museum Facebook

Leighton House Collection

Lavender Hill Studios

Lavender Hill Studios Facebook

Monday 16 February 2015

Simon Lee Workshop - Week 4,5 & 6

I found after doing the 2" skull that the much smaller head on my character was easier and I am getting a better feel for handling the clay.  After roughing in the head I then went back to adjusting the pose and also thinking of the overall composition placing my character so he has just landed on a rocky ledge causing a rock slide.

Feeling quite happy with this roughed in stage I now need to work on the anatomy. In Week 4 videos Simon showed his tools and also how you can make your own loop tools from thin armature wire or guitar strings attached to wooden dowels or anything that would make a handle.


Week 5 videos went over further refinement using loop and ball stylus tools along with isopropyl alcohol to smooth out hard edges and tool marks. In Week 6 videos Simon also discussed the more advanced stages of moving into multiple character compositions and also adding other characters and props to reinforce your main character.  He also showed some very cool examples of his own sculptures which were amazing and very inspiring. One of this weeks videos showed how to approach sculpting hands and he does this without any armature wire as he feels the use of wire would stiffen the gesture.


For me the next step is to see how far I can take my anatomy knowledge with this character and then I shall move onto the next one and keep practising these stages of Simon's process. I do not have the skills yet to design like this from my imagination with drawing so it is pretty exciting to have got to this stage so quickly. I guess that is the beauty of Simon Lee's design approach and I highly recommend his online course.


Saturday 14 February 2015

Simon Lee Workshop - Week 3

The homework for Week 3 was to sculpt a very small humanoid head. I found this very challenging which is why it ended up taking me a few days to do. At first I kept squashing areas I had already sculpted but I found that if I let the clay get quite hard it was easier to work at this scale. Symmetry was also a big issue for me and something to work on as I progress.

I started of just aiming to do a skull but then I liked the idea of the dropped jaw, and arched menacing brows which made the sculpting even more fiddly for me. What fun though, I just kept at it and I was quite pleased to get to this stage as this skull is only 2" high. Next I have to sculpt my head for my maquette which is about half the size of this one, so it is going to be even more challenging. Simon recommends you do at least 10 heads before you get comfortable with the process.


Sunday 1 February 2015

Simon Lee Workshop - Week 2

This week I have been working on posing.  Although I am using a much thicker wire I have still tried to think about the natural balance of the pose so that my sculpt would be balanced in real life.  It is challenging with the hardness of the clay but this stage is a lot of fun to do. I could have tried out different poses for ages but as I am already a week behind I just did a couple.


Pose 1 my first attempt.


Pose 2
I got the inspiration for this pose from a 20 min life drawing I had done earlier in the week. Toying with the idea of giving him Wolverine  hands or knives of some kind.  I ended up losing a lot of the anatomy I did have after doing this pose but I am hoping I can sculpt it back.

Sunday 25 January 2015

Simon Lee Workshop - Week 1

I am currently doing an online workshop with artist Simon Lee.  Simon is a concept designer and sculptor working on films like Pacific Rim. He is self taught and it wasn't until his forties that he found himself being approached by Guillermo del Toro to work on his film. There is a very interesting interview that Stan Winston workshop did with Simon here https://www.youtube.com/watch?v=ZO9Alq1UFZw and for those of you who love monsters and creatures you should check out Simon's website http://www.bigbluetree.com/

This week we started off making a very simple armature with aluminium wire. The sculpt is about 11" tall. I found the wire I had a bit hard to work with due to it's thickness about 1/8th (3mm)" so I am just doing the best I can and have ordered some thinner wire to try. I am using Chavant medium clay which I am warming to a workable condition in a little toaster oven.  What I hadn't really thought about though was it is winter and I have found the clay is hardening quicker than I can work it so I am thinking that the Chavant soft may be better for the winter months here in the UK. These teething problems have slowed me down doing my first weeks homework but what has been most challenging is sculpting a simple humanoid form as I do not yet have much knowledge of anatomy, so this has been a great study to do and one I will practice often.


Homework Week 1

So after taking the video above I kept working as it is very addictive using references of anatomy to help me. I need to stop now though and move on to Week 2 which is all about posing as I am already behind and I can continue to practice this stage later on. It really is a fun way to study anatomy.


Sunday 4 January 2015

Sculpture 2014 - Term 2

Coming back after the summer holidays we started Term 2 with a 2 day lying pose.  No measuring on this one and we got to choose what scale we did. I decided to try and block in the whole pose and learning from my previous experience mad sure I built up this pose so it wasn't too flat like my last effort. This is about 8 hours sculpting.


We then moved onto a 3 day pose about 12 hours.  Again I decided to go fairly small and block in the whole pose. No measuring with this one just sighting like we do when drawing.  Having the opportunity to do this laying down pose has been great as I so rarely get to see this kind of pose so it becomes very challenging to work out the gesture,proportions and the forms of the anatomy.


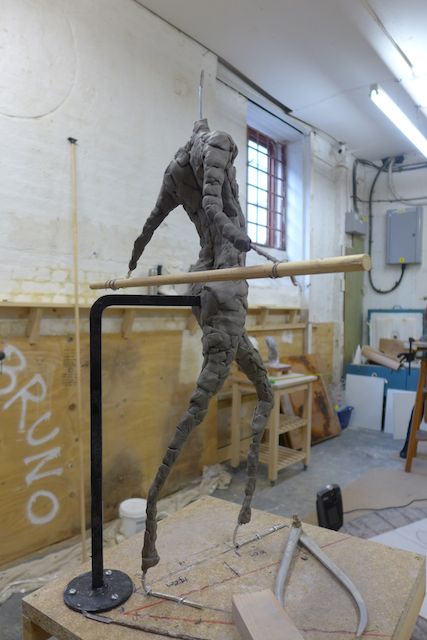
The last half of term was spent working on a standing pose, and what a great pose it is. This has to be the most exciting pose I have ever seen. The gesture is great and so powerful. I have spent 8 days so far on this so about 32 hours.  We started of taking height measurements of the major anatomical bone points. So sole of foot to patella, sole of foot to illiac crest, sole of foot to super sternal notch, Sole of foot to acromium process.  As I type this I am trying to remember the anatomical names, not so easy, but sculpting is a great way to learn anatomy I think.  We also took widths of hips and shoulders.  As we are working to a third scale all measurements are divided by 3 and then the lengths and widths are added together and extra added for a  base.  This is quite maths intensive for me as numbers are my weakness so I was pleased when we finally had our armature wires worked out and built.  


This is a page from Edouard Lanteri's book Modelling and Sculpting the Human Figure which should give a better idea of how the armature was built. Ours were more simple, without the hand wires and butterflies.  I think measuring and armature building is something I will have to do a lot of before I really know what I am doing and get it fixed in my brain.  An error I made when nailing the wires to my board was that I had not really sighted the back iron in relation to the feet.  This meant my armature looked like it was falling over so I had to take them up and do it again.  This made me realise that I should have looked at the position of the super sternal notch, which is a fixed position on the model and does not move.  From this I should have dropped a horizontal and taken note of the feet placement in relation to this.  The sighted horizontal then becomes the back iron and you can place the wires with better accuracy.  


Once the armature is attached to the board the wire is bent into the shape of the gesture and we applied small amounts of clay which we squeezed on in doughnut shapes all over the wires.  This was left for a week so that it would provide a strong structure to build on.


My progress week to week was fairly slow mainly because I do tend to be slow but also because I was conscious of over building, something I want to try to avoid as this means you have to scrape of and can loose the texture you get as you build. I would like to try to keep some texture on this sculpt rather than smoothing it all down. 


I am quite happy with it at this stage and I shall continue to progress slowly as I try to work out the forms I am looking at which is very challenging with such a well muscled model.  Doing this sculpture really makes me realise how important learning surface anatomy is for artists and also how to simplify that anatomy into planar forms. Hopefully I should get to spend another 5 days on this.  Not enough time to finish but I shall just get what I can done.  Having the opportunity to spend so long studying a pose like this is great and has been a real highlight of my year.

Sculpture 2014 - Term 1

I was lucky enough to have the opportunity to do a full days sculpting at Lavender Hill studios last year. Ever since my first attempt at sculpting I have been keen to do more so this has been really exciting for me.

Term 1- My first challenge was to copy this cast. Straight away our teacher pointed out the we were going to flat and not getting the height of the ribs created by the arch in the back. 

Term 1 - This was a 5 week pose averaging about 4 hours sculpting a day. Again I failed at first to get the height of the ribs from the arch in the back. This has been a good lesson to learn as I rarely get to see and draw laying poses of this nature.

Term 1 - This was a 4 hour attempt to quickly block in a head from the life model.


At the end of this first term we moved into a new sculpture studio which is a great space to work in. Here I took the quick head and began to turn it into a skull.  I couldn't help think that it was turning into an orc from Lord of the Rings.

During the summer holiday break I did a one week sculpture course at Lavender Hill studios. I was asked to just help out with those who were new to the studios and I really enjoyed this. We spent the first three days working on a copy of the skull cast. Which I finished off when we went back for Term 2. The clay had dried out quite a bit so I took it as far as I could. I really enjoyed the challenge of doing the teeth.


The last two days of the July course were spent doing a quarter size portrait, which I found very challenging due to the scale but also this is the first portrait I have sculpted from a life model and it felt very invasive to approach the model with the callipers. She was fine but I obviously need to work on this.  Not the best likeness but for me it is all about trying and seeing what happens. I try not to let the fear of failure stop me from trying as this is how I learn.